Popular Searches
 DVD&Video Tools
Related Keywords
How to enjoy DVD Movies/Videos/Flash on your iPod (for Mac)
Are you a Mac user?Do you want to enjoy DVD movies/videos/Flash videos on your iPod Touch/Classic/Nano on Mac OS X?
You may find the following guide are quite helpful to you.
There are three parts in this guide:
Part 1: How to convert DVD to iPod on Mac
Part 2: How to convert videos to iPod on Mac
Part 3: How to convert Flash to iPod on Mac
Make preparations:
(1) You iPod and DVD/Videos/Flash videos
(2) Mac OS X machine
(3) DVD to iPod converter for Mac, 4Media iPod video converter for Mac ,FLV to iPod Converter for Mac
Part 1: How to convert DVD to iPod on Mac
Step 0:Download and install Wondershare DVD to iPod coverter for Mac (Power PC ) (Intel PC)
Step 1: Run the software and Import DVD Movies
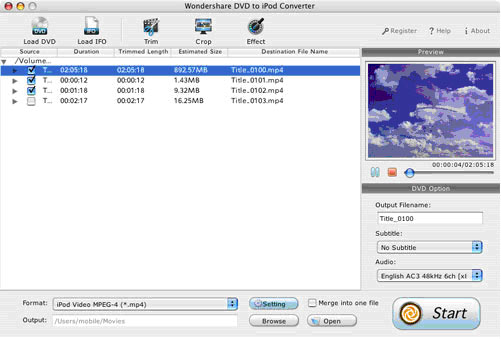
Click the Load DVD button, select the folder of your DVD movie, and click OK. If the DVD movie is on your disc drive, you can just select the drive and click OK.
Or click the Load IFO button, open the folder of your DVD movie, and you will find two folders in it: AUDIO_TS and VIDEO_TS. Open the VIDEO_TS folder, select all the IFO files, and then click OK.
After the DVD movie is imported, you can see all the DVD chapters/titles in it, and then you can check the DVD chapters/titles you want to rip to your iPod. If you want to rip the whole movie, you can just keep all the DVD titles/chapters checked.
Step 2: Output Settings
Before ripping DVD movies to iPod video files, there are a few settings you should make:
1. Select the iPod Video format from the Format drop-down list(Apart from ripping DVD to iPod video, it can even rip DVD to iPod audio).
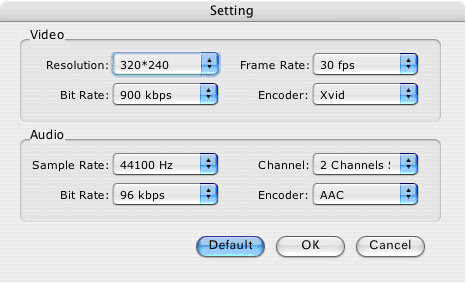
2. Click the Settings button to make encoding settings including video resolution, frame rate, bit rate and video encoder, audio encoding settings including sample rate, channel, bit rate and audio encoder.
3. Name each DVD title/chapter in the Output Filename field, and select the DVD subtitle and audio track for the DVD titles/chapters.
Note: You can check the "Merger into one file" option to join all the selected DVD titles/chapters into one file instead of creating a separated file for each title/chapter.
Step 3: Start Conversion
Click the Start button to start ripping DVD movies to iPod. Now you can just go talk a walk and wait till the DVD to iPod conversion is completed. After that, you can just transfer the created files to your iPod with iTunes.
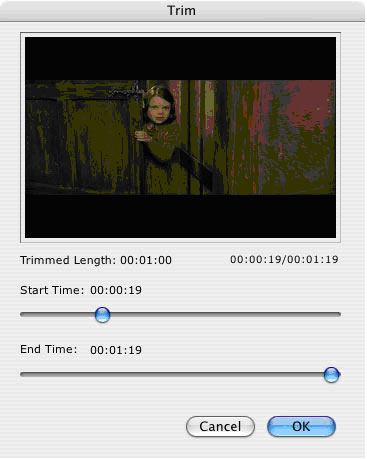
Tip 1: Trim Movie
If you just want to rip a clip from your DVD movie, you can click the Trim icon to capture the clip. In the Trim window, you can trim the length of the current title/chapter by either dragging the Start Time and End Time sliders or setting the time parameters in each corresponding field.
Tip 2: Crop Video
If you DVD video has black sides, you can use this Crop function to remove them. Click the Crop icon to open the Crop window, and set the crop area by dragging the crop frame or setting the four crop parameters (Top, Bottom, Left and Right).

Tip 3: Movie Effect
If you are not content with the original effect, you can click the Effect icon to set the video brightness, contrast, saturation, and audio volume. You can also choose to apply a special effect to your movie video from effects including Gray, Emboss and Negative.
Part 2: How to convert videos to iPod on Mac
Step 0: download and install 4Media Video Converter for Mac (Power PC ):(Intel PC )
Step 1: Load Files
Click "Add" button in the left top of main menu and open pop-up window. Browse and select the folder to find video or audio files you wish to convert.
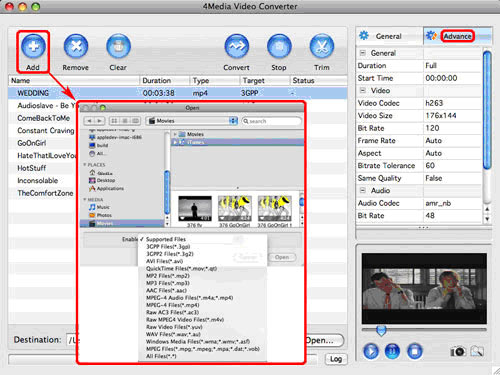
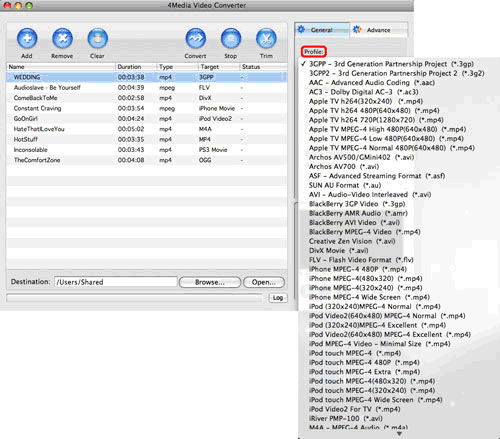
Step 2: Output Settings
Select one file and it' s highlighted. In the "General setting", choose one format you want the file to be converted to in the "Profile" combo box. Video and audio quality can be adjusted, and you can also modify the output file.
"Advanced" contains more specific settings like video codec, frame rate, channels, etc. Change them as you need.
On the right-hand corner, you can preview the video file. Take a snapshot by clicking the camera-like button when playing.
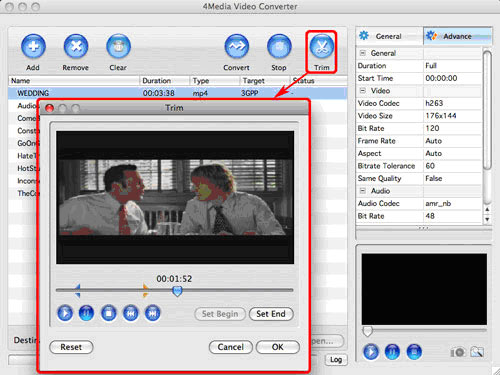
Step 3: Trim Your Video (optional)
If you feel the video have some parts you dislike when previewing, click "Trim" button to set "Begin" and "End" point for the segment you want to retain when playing the video. After clicking "OK", the item you made changes will display a blue scissors on the left of the file name.
Well now you have made all your settings, we are ready to begin.
Step 4: Conversion
Select one file or several you want to convert in the queue. This is simply done by clicking the "Convert". That makes batch conversion very easy and it will convert the files one by one in the queue. Once you want to end the conversion, just click "Stop" button to give up this operation. Click "Convert" again, it will restart converting the item.
And you can see the conversion status for each item at the end of the line.
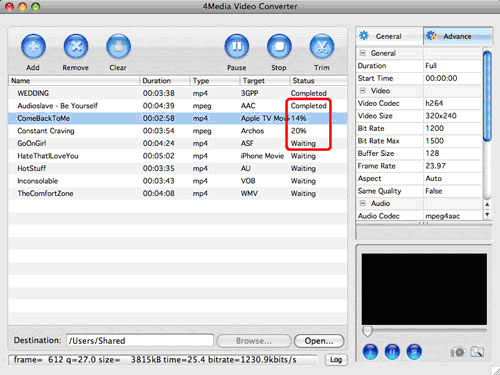
After Minutes of Waiting it will display "Completed" by the end of conversion in the "Status" row. Click "Open" to see the file you've converted.
Part 3: How to convert Flash to iPod on Mac
Step 0: Download and install iSkysoft FLV to iPod Converter for Mac. (Power PC ):(Intel PC)
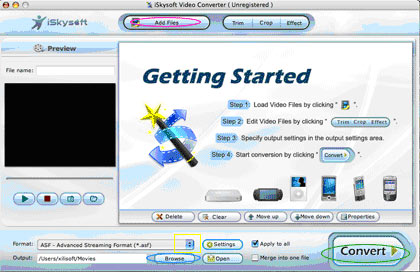
Step 1: Click the "Add Files" button to select some FLV files you want to convert.
Step 2: In the output format option, click the down arrow, then choose iPod format as you want .
Step 3: Under the output Folder , Click the"Browse" button to select the destination folder you want your Flv videos to store.
Step 4: Click the "Convert" button to start the conversion and it will be finished in a short while.
Now enjoy DVD Movies/Videos/Flash Videos on your iPod.